Managing customer relationships effectively can make or break a small business. As your customer base grows, keeping track of leads, deals, and customer interactions using spreadsheets or scattered notes becomes increasingly difficult. This is where a Customer Relationship Management (CRM) system becomes essential.
Zoho CRM stands out as one of the most popular choices for small businesses, offering a perfect balance of powerful features and affordability. With over 250,000 businesses worldwide using Zoho CRM, it has proven itself as a reliable solution that can scale with your business growth.
In this comprehensive guide, you’ll learn exactly how to set up Zoho CRM for your small business, from initial account creation to advanced customization. Whether you’re new to CRM systems or migrating from another platform, this step-by-step tutorial will help you get up and running quickly.
Why Small Businesses Choose Zoho CRM
Before diving into the setup process, it’s worth understanding why Zoho CRM is particularly well-suited for small businesses.
Affordability: Zoho CRM offers a free plan for up to three users, making it accessible for startups and micro-businesses. Paid plans start at competitive prices, significantly lower than enterprise alternatives like Salesforce.
Ease of Use: The interface is intuitive and doesn’t require extensive technical knowledge. Most small business owners can navigate the system without dedicated IT support.
Scalability: As your business grows, Zoho CRM grows with you. You can start with basic features and add more sophisticated functionality as needed.
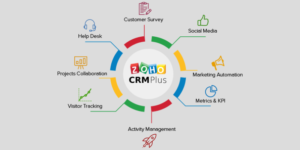
Integration Capabilities: Zoho CRM integrates seamlessly with popular business tools including Gmail, Outlook, MailChimp, QuickBooks, and the entire Zoho ecosystem of business applications.
Customization: Unlike rigid CRM solutions, Zoho allows extensive customization to match your specific business processes without requiring coding skills.
Prerequisites: What You Need Before Getting Started
Before you begin setting up Zoho CRM, gather the following information and resources:
- A business email address (Gmail, Outlook, or your company domain)
- Your company information (name, address, industry, size)
- A clear understanding of your sales process and stages
- List of team members who will use the CRM
- Any existing customer data you want to import (in CSV or Excel format)
- Information about your business timezone and currency settings
Having these details ready will streamline the setup process and prevent interruptions.
Step 1: Creating Your Zoho CRM Account
The first step in setting up Zoho CRM is creating your account.
Visit the Zoho CRM website and click on the “Sign Up” button. You’ll be presented with several plan options including the free edition. For most small businesses just starting out, the free plan provides sufficient functionality to manage basic customer relationships.
Enter your business email address and create a strong password. Zoho will send a verification email to confirm your address. Click the verification link in your email to activate your account.
During the initial setup wizard, Zoho will ask several questions about your business:
- Company Name: Enter your official business name
- Industry: Select the industry that best describes your business
- Number of Employees: Choose your company size range
- Country and Timezone: This ensures proper date and time stamps
- Currency: Set your default currency for deals and quotes
Complete these fields accurately as some settings are difficult to change later, particularly timezone and currency configurations.
Step 2: Configuring Basic Company Settings
Once your account is created, access the Setup menu by clicking the gear icon in the top-right corner. This is your control center for all CRM configurations.
Navigate to Company Details and fill in comprehensive information:
- Upload your company logo (this appears on emails, quotes, and invoices)
- Add complete business address details
- Enter contact information including phone numbers and website
- Set your fiscal year start date (important for reporting)
- Configure your organization’s business hours
These details ensure professional communication with customers and accurate reporting.
Next, go to Personal Settings to configure your individual user preferences:
- Set your personal timezone if different from company settings
- Choose your date and time format preferences
- Configure email signature for outgoing communications
- Set up your notification preferences
Step 3: Setting Up Your Sales Process
A CRM is only as effective as the sales process it supports. Zoho CRM comes with default stages, but customizing them to match your actual sales workflow is crucial.
Navigate to Setup > Customization > Modules and Fields > Deals.
Here you’ll find the Deal Stages or Pipeline settings. The default stages typically include:
- Qualification
- Needs Analysis
- Value Proposition
- Proposal/Quote
- Negotiation
- Closed Won
- Closed Lost
Modify these stages to reflect your actual sales process. For example, a consulting business might use:
- Initial Consultation
- Proposal Sent
- Proposal Review
- Contract Negotiation
- Contract Signed
- Closed Lost
For each stage, you can set:
- Probability Percentage: The likelihood of closing at this stage
- Stage Type: Whether it’s an open, won, or lost stage
- Expected Duration: How long deals typically remain in this stage
Setting realistic probability percentages is essential for accurate sales forecasting.
Step 4: Customizing Modules and Fields
Zoho CRM organizes information into modules like Leads, Contacts, Accounts, Deals, and Tasks. Each module contains fields that capture specific information.
Navigate to Setup > Customization > Modules and Fields to customize these modules.
Adding Custom Fields: Your business likely needs to track information beyond the default fields. Click on any module and select “Add New Field” to create custom fields:
- Choose the field type (text, number, date, dropdown, checkbox, etc.)
- Name the field descriptively
- Make it mandatory if the information is critical
- Add it to the layout where users will see it
For example, a real estate business might add custom fields to the Deals module like “Property Type,” “Square Footage,” and “Number of Bedrooms.”
Creating Custom Modules: If your business has unique requirements, you can create entirely new modules. For instance, a gym might create a “Membership” module to track member subscriptions separately from regular deals.
Field Dependencies: Set up conditional fields where one field’s value determines which other fields appear. This keeps your forms clean and relevant.
Step 5: Importing Your Existing Data
If you’re migrating from spreadsheets or another CRM, you’ll want to import your existing customer data.
Navigate to Setup > Data Administration > Import.
Zoho CRM supports importing:
- Leads
- Contacts
- Accounts
- Deals
- Products
- Tasks and Events
Before importing, prepare your data:
- Clean your data: Remove duplicates and fix formatting issues
- Use CSV or Excel format: Ensure your file is in a compatible format
- Match fields correctly: Map your spreadsheet columns to Zoho CRM fields
- Start small: Test with a small batch before importing everything
During the import process:
- Select the module you’re importing to
- Upload your file
- Map your columns to Zoho fields (Zoho attempts automatic matching)
- Choose how to handle duplicates (skip, overwrite, or merge)
- Review the preview before final import
After importing, check your data carefully to ensure everything imported correctly. Look for any missing information or incorrect field mappings.
Step 6: Adding and Managing Users
As a small business, you’ll likely have multiple team members who need CRM access.
Navigate to Setup > Users and Control > Users to add team members.
Click “Add User” and enter:
- Full name
- Email address
- Role (determines permissions)
- Profile (determines what they can access)
Understanding Roles and Profiles:
Roles define the hierarchy and what data users can see. The typical role hierarchy is:
- CEO (sees all data)
- Manager (sees their data and subordinates’ data)
- Sales Representative (sees only their own data)
Profiles determine what actions users can perform (create, edit, delete records, run reports, etc.).
For small teams, you might start with simple roles like “Manager” and “Team Member.” As your team grows, create more specific roles that match your organizational structure.
Set up Reporting To relationships to establish your team hierarchy. This ensures managers can see and help with their team members’ deals and activities.
Step 7: Email Integration
Email is central to customer communication, and integrating your email with Zoho CRM saves time and ensures nothing falls through the cracks.
Gmail Integration: Navigate to Setup > Channels > Email > Gmail. Click “Configure” and authorize Zoho to access your Gmail account. This allows you to:
- Send and receive emails directly from CRM
- Automatically associate emails with the right contacts and deals
- Track email opens and clicks
Outlook Integration: Similar to Gmail, navigate to the Outlook integration settings and follow the authorization process.
IMAP Configuration: If you use a different email provider, configure IMAP settings by entering your email server details.
After integration, you can:
- View all customer email history within their CRM record
- Create emails using templates
- Schedule emails to send later
- Set up email reminders and follow-ups
Step 8: Setting Up Automation Rules
Automation is where Zoho CRM truly shines, helping small businesses do more with limited resources.
Workflow Rules: Navigate to Setup > Automation > Workflow Rules.
Workflow rules automatically perform actions when certain conditions are met. For example:
- Send a welcome email when a new lead is created
- Assign leads from specific sources to designated sales reps
- Update deal stage when certain activities are completed
- Create follow-up tasks when deals reach specific stages
To create a workflow rule:
- Choose the module (Leads, Deals, etc.)
- Define when it executes (on creation, edit, or both)
- Set conditions (if lead source equals “Website,” if deal value exceeds $10,000)
- Define actions (send email, assign owner, create task)
Assignment Rules: Automatically distribute leads or deals among team members based on territory, lead source, or other criteria. This ensures fair distribution and quick response times.
Webhooks: For advanced users, webhooks can trigger actions in external applications when something happens in Zoho CRM.
Step 9: Creating Reports and Dashboards
Data-driven decisions separate successful businesses from struggling ones. Zoho CRM provides powerful reporting tools.
Navigate to Reports from the main menu. Zoho includes pre-built reports like:
- Lead Conversion Ratio
- Sales Pipeline
- Lost Deals Analysis
- Activity Reports
Creating Custom Reports:
- Click “Create Report”
- Select the module to report on
- Choose report type (summary, tabular, or matrix)
- Select columns to display
- Add filters to focus on specific data
- Set grouping and sorting options
Save your report and schedule it to run automatically, sending results to your email daily, weekly, or monthly.
Dashboards provide visual representations of your data. Create a dashboard with charts showing:
- Sales pipeline value by stage
- Monthly revenue trends
- Lead sources performance
- Individual team member performance
Place your most important metrics on your dashboard for at-a-glance insights when you log in.
Step 10: Mobile App Setup
Small business owners are often on the go. Zoho CRM’s mobile app ensures you stay connected to customers anywhere.
Download the Zoho CRM app from the App Store or Google Play Store. Log in with your CRM credentials.
The mobile app allows you to:
- Check in on deals and update stages
- Log calls and meetings immediately after they occur
- Add new leads while at networking events
- Respond to customer inquiries from anywhere
- Review your daily agenda and tasks
Configure push notifications in the mobile app settings to stay informed about important updates without constantly checking the app.
Best Practices for Small Business CRM Success
Setting up the technical aspects is only half the battle. Here are essential practices for CRM success:
Enforce Data Entry Standards: Establish clear guidelines for how information should be entered. Inconsistent data makes reporting unreliable.
Regular Data Cleaning: Schedule monthly or quarterly data audits to remove duplicates, update outdated information, and merge similar records.
Encourage Adoption: The best CRM is worthless if your team doesn’t use it. Provide training, make it part of daily workflow, and demonstrate how it makes their jobs easier.
Start Simple: Don’t try to implement every feature on day one. Master the basics first, then gradually add complexity.
Review and Adjust: Your first setup won’t be perfect. Regularly review what’s working and what isn’t, and adjust accordingly.
Maintain Data Security: Set appropriate permissions, use strong passwords, and enable two-factor authentication to protect sensitive customer data.
Common Mistakes to Avoid
Learning from others’ mistakes saves time and frustration:
Over-Customization: Adding too many custom fields and modules creates confusion. Keep it simple initially.
Neglecting Training: Assuming team members will figure it out leads to poor adoption and data quality issues.
Poor Data Migration: Importing messy data pollutes your new CRM from day one. Clean data before importing.
Ignoring Mobile Access: Not encouraging mobile app usage means activities and updates don’t get logged in real-time.
Setting and Forgetting: CRM requires ongoing maintenance and optimization. Regular reviews ensure it continues meeting your needs.
Setting up Zoho CRM for your small business is an investment in organized growth and better customer relationships. While the initial setup requires time and thought, the long-term benefits include increased sales efficiency, better customer insights, and scalable processes that grow with your business.
Start with the basics outlined in this guide: create your account, configure company settings, customize your sales process, import data, add users, integrate email, and set up basic automation. As you become comfortable with these fundamentals, explore advanced features like advanced workflows, AI-powered predictions, and deeper integrations.
Remember, successful CRM implementation is a journey, not a destination. Regular optimization based on how your team actually uses the system ensures Zoho CRM continues delivering value as your business evolves.
Ready to transform how you manage customer relationships? Start your Zoho CRM setup today and take the first step toward more organized, efficient, and profitable customer management.